
Appetizers
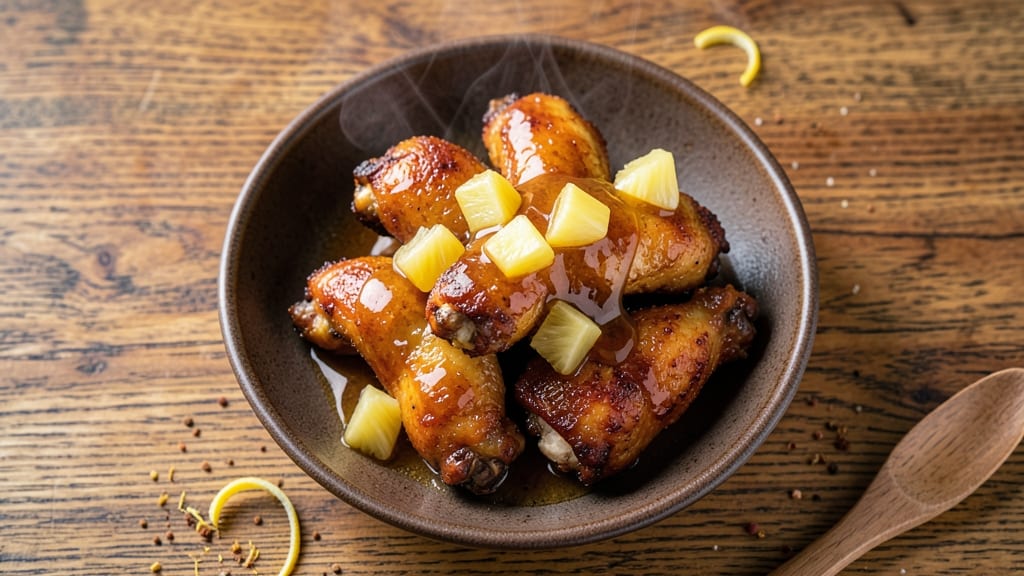
This brown sugar pineapple wings recipe transforms classic wings into a tropical-inspired masterpiece with a caramelized glaze that balances rich sweetness and smoky depth. The star is the homemade glaze—a perfect marriage of brown sugar and pineapple that creates a sticky, caramelized crust with bursts of fruity brightness.
I developed this recipe after craving something sweet yet savory, and it quickly became a crowd favorite at game day gatherings.
The process is straightforward but yields restaurant-quality results. You'll start with classic crispy wings, then brush them with a glaze that's equal parts sweet and tangy, achieving that signature caramelized finish through careful baking.
The pineapple adds a subtle tropical note that complements the smoky-sweet glaze beautifully. This recipe delivers a perfect balance of textures—crispy wings with a glossy, caramelized coating that's irresistibly sticky.
What makes these wings truly special is how the glaze transforms ordinary wings into an unforgettable appetizer. The caramelization deepens the flavors while the pineapple adds a refreshing contrast, making each bite a harmonious blend of sweet, smoky, and tangy.
Serve them with classic sides like celery sticks and ranch for dipping, or pair with a crisp coleslaw to cut through the richness. The aroma alone will have everyone gathering around your table.
Perfect for game day, parties, or when you're craving something sweet yet satisfying, these wings are sure to impress. The recipe scales easily, so you can make a small batch for a weeknight treat or double it for a crowd.
Let's get started on creating these irresistible brown sugar pineapple wings that will have everyone asking for seconds.
Ingredients for brown sugar pineapple wings
Sweet, smoky, and tropical—these 13 ingredients create wings that'll steal the show every time.
| Ingredient | Amount | Notes |
|---|---|---|
| Wing Pieces 🍗 | 2 lb | Drumettes and flats, skin-on preferred |
| Brown Sugar 🍯 | ¾ cup | Light or dark, packed tightly |
| Pineapple Juice 🍍 | ½ cup | Freshly squeezed preferred |
| Honey 🍯 | ¼ cup | Wildflower or clover variety |
| Soy Sauce 🍶 | ¼ cup | Low-sodium preferred |
| Apple Cider Vinegar 🍏 | 2 tbsp | For tangy depth |
| Garlic Cloves 🧄 | 4 cloves | Minced for glaze |
| Fresh Ginger 🌿 | 1 tbsp | Grated finely |
| Smoked Paprika 🌶️ | 1 tbsp | For smoky depth |
| Ground Black Pepper 🌶️ | 1 tsp | Freshly cracked |
| Olive Oil 🫒 | 2 tbsp | For tossing wings |
| Salt 🧂 | 1 ½ tsp | Kosher or sea salt |
| Fresh Pineapple Chunks 🍍 | ½ cup | For garnish (optional) |
The wings are the canvas, so don't skimp on quality. Look for skin-on drumettes and flats at Whole Foods or your local butcher—the skin crisps beautifully and adds texture. If you're using frozen wings, thaw them overnight in the fridge for even cooking. The pineapple juice is non-negotiable for that authentic tropical brightness, but Trader Joe's has a great bottled version if fresh isn't an option. For the ginger, fresh is best—the dried stuff just can't compete in flavor. I always double-check my brown sugar is packed tightly in the measuring cup for that perfect caramelized glaze.
No pineapple juice? Coconut water or orange juice works in a pinch, though the flavor will be slightly different. Running low on honey? Maple syrup at a 1:1 ratio keeps things sweet without altering the balance too much. The smoked paprika adds that signature depth—if you can't find it, regular paprika plus a pinch of liquid smoke mimics it well. Fresh ginger not available? Ground ginger at half the amount will do, but you'll lose some of that bright zing. Pro tip: Let the glaze ingredients sit at room temperature for 10 minutes before mixing—the flavors meld beautifully.
These wings taste even better the next day, so make extra if you're feeding a crowd. Store leftovers in an airtight container in the fridge for up to 4 days, or freeze for 3 months—just reheat in a 350°F oven for 10-15 minutes. The glaze thickens as it cools, so if it seems too stiff, a quick microwave zap with a splash of water brings it back to perfection. For serving, toss with fresh pineapple chunks right before digging in—the contrast of warm wings and cool fruit is pure magic.
Why You'll Love This Recipe
- Five-Ingredient Magic: I swear by this combo—brown sugar’s caramel bite, pineapple juice’s tang, and just a splash of soy for depth. No fancy marinades, no stress, just that perfect balance of sweet and savory.
- Crowd-Pleaser Glaze: Between us, this is the wing sauce that makes people actually finish their plates. The honey keeps it sticky-sweet without being cloying, and the brown sugar gives it that irresistible caramelized crust. (Yes, even my picky uncle asks for seconds.)
- Game Day Ready: Throw these on a tray, pop in the oven, and boom—your Super Bowl spread just got 10x easier. They reheat like a dream, so you’re not stuck making fresh batches for late arrivals. (Pro tip: Serve with extra pineapple slices for dipping.)
- Budget-Friendly Feast: You’re getting restaurant-quality flavor for pennies—brown sugar and pineapple juice stretch far, and wings are cheaper than takeout. Plus, leftovers? They’re even better the next day, crispy edges and all. (My wallet thanks me every time.)
Step-by-step instructions for caramelized glazed wings
Here's how to transform simple wings into sticky, caramelized perfection with that perfect balance of sweet, tangy, and smoky flavors.
Prepare the Wings for Maximum Crispiness
Pat the 2 lb wing pieces completely dry with paper towels—this is absolutely critical for crispy skin. I like to separate the drumettes and flats for even cooking. In a large bowl, toss the wings with 2 tbsp olive oil until they're evenly coated. This helps the seasoning stick and creates that beautiful golden crust.
In the same bowl, add 1.5 tsp salt, 1 tbsp smoked paprika, 1 tsp ground black pepper, and 1 tbsp grated fresh ginger. Mix until every wing is thoroughly coated. Let them sit at room temperature for 15 minutes while you preheat your oven to 425°F. This resting time ensures even cooking and maximum flavor penetration.
Roast Until Golden and Crispy
Spread the seasoned wings in a single layer on two rimmed baking sheets, leaving space between each piece. Roast for 25 minutes, flipping halfway through at the 12-minute mark. You're looking for deep golden brown color and crispy skin—this is where all the magic happens. The wings should be cooked through but still juicy inside.
I press down gently on the wings during the first minute after flipping—this prevents them from curling and ensures even contact with the hot pan. If you notice any pieces browning too quickly, rotate the pans for more even cooking. The high heat caramelizes the natural sugars in the wings, creating that irresistible crispy texture.
Create the Sticky Glaze
While the wings roast, make the glaze by combining 0.75 cup brown sugar, 0.5 cup pineapple juice, 0.25 cup honey, 0.25 cup soy sauce, 2 tbsp apple cider vinegar, and 4 minced garlic cloves in a saucepan. Bring to a boil over medium-high heat, then reduce to medium-low and simmer for 8-10 minutes until thickened to a syrupy consistency.
Here's the thing—you want the glaze to coat the back of a spoon but still be pourable. If it thickens too quickly, add 1-2 tablespoons of water to loosen it. The aroma should be intoxicating—caramelized sweetness with a hint of tangy pineapple and smoky garlic. Remove from heat and let it cool slightly while you prepare to glaze the wings.
Glaze and Caramelize to Perfection
Return the oven to 425°F and place the roasted wings back on the baking sheets. Using a pastry brush, generously coat each wing with the warm glaze, making sure to get it on all sides. Return to the oven and bake for 10-12 minutes until the glaze is deep amber and bubbly.
This is where the real transformation happens—the glaze caramelizes, creating those beautiful crackly edges and sticky-sweet coating. Watch closely in the last few minutes—you want it to be glossy and sticky, not burnt. If the glaze sets too quickly, brush on a little more to maintain that perfect texture.
Garnish and Serve Immediately
Remove the wings from the oven and let them rest for 2-3 minutes before serving. This brief rest allows the glaze to set slightly while keeping the wings warm and juicy. Garnish with 0.5 cup fresh pineapple chunks for that tropical touch and a sprinkle of extra smoked paprika for visual appeal.
Serve immediately with extra glaze on the side for dipping—these wings are best enjoyed while the glaze is still warm and sticky. The contrast of crispy wings with that sweet-tangy glaze is what makes this recipe truly special. Trust me, the first bite will have you reaching for more!
Pro Tips For Making Brown Sugar Pineapple Wings
- CRANK UP THE HEAT: Brown sugar burns faster than you think—start your wings over direct flame or on the hottest grill rack you’ve got. I used to play it safe with medium heat, and my glaze turned clumpy and bitter. Now I blast them for the first 3 minutes, then dial it back to let the sauce caramelize.
- DRIZZLE, DON’T DROWN: Skip the heavy hand with pineapple juice. After tossing wings in the glaze, spread them in a single layer on a wire rack (yes, even if you’re impatient like me). Brush on just enough juice to coat—about 2 tablespoons per pound of wings—so it clings instead of pooling. The rack keeps them crispy, not soggy.
- SWEETEN THE DEAL EARLY: Mix your brown sugar and honey before adding soy sauce. The acid in soy sauce will crystallize the sugar if you toss it in raw—trust me, I’ve scraped off enough gummy glop to know. Stir the wet ingredients first, then fold in the wings. Smooth glaze every time.
- SAVE THE SOY SAUCE: Don’t dump the whole bottle. Use a high-quality light soy sauce (like Kikkoman) and measure it—about 2 tablespoons per pound of wings. The cheap stuff adds salt without depth, and too much turns your sticky glaze into a salty sludge. Taste as you go; you can always add more, but you can’t un-salt wings.
Essential equipment for this recipe
Oven Essentials
You'll need a heavy-duty rimmed baking sheet—I recommend All-Clad stainless steel or Ceramic City for even heat distribution. These sheets handle high temperatures without warping, which is crucial for achieving that perfect deep golden brown color on your wings.
Use two sheets to prevent overcrowding, ensuring crispy skin on all sides. 🔥
Glazing Tools
A pastry brush with silicone bristles is your best friend for applying the glaze evenly. I use a West Bend silicone brush because it holds up to high heat and doesn’t leave bristle marks on the sticky coating.
Avoid metal brushes—they can react with acidic ingredients like pineapple juice. For extra precision, a small offset spatula works well for spreading glaze in hard-to-reach spots.
Thermometer
An instant-read meat thermometer is non-negotiable for perfect wings. I swear by the ThermoWorks Smoke—it’s fast and accurate, helping you avoid overcooking. The wings should reach 165°F internally before glazing.
This ensures they’re fully cooked while staying juicy underneath that caramelized crust. Pro tip: Check the thickest part of the meat, not near the bone.
Mixing Essentials
For the glaze, a medium-sized saucepan with sloped sides (like Calphalon) prevents spills when simmering. A wooden spoon or heatproof silicone spatula helps stir without scratching the pan.
If you’re making extra glaze for dipping, grab a small airtight container—I use Rubbermaid glass jars to store leftovers in the fridge for up to 5 days.
Optional Air Fryer
For a quicker (but slightly less crispy) version, an air fryer works wonders. The Ninja Foodi 5.5-quart handles 2 lb wings in batches, and the built-in basket doubles as a glaze applicator. Cook at 375°F for 12 minutes, flip, then glaze and crisp at 400°F for 3-4 minutes.
The glaze caramelizes faster in the smaller space, so keep a close eye on it!
Serving Gear
Presentation matters! Use a large platter with a wooden board underneath to catch drips. For garnishing, a small bowl for pineapple chunks and a mini shaker for extra smoked paprika add that restaurant-quality touch.
If serving buffet-style, a chafing dish keeps the wings warm for hours. Don’t forget paper towels—these wings are sticky business! 🍽️
Nutrition facts
Frequently asked questions
Can I use frozen wings for this recipe?
Just thaw them completely in the fridge overnight before starting. Never use frozen wings straight from the freezer—they won't cook evenly and the skin won't crisp properly. Pat them completely dry after thawing to ensure maximum crispiness.
How do I prevent the glaze from burning?
Keep a close eye on the wings during the final glazing stage—this is when the glaze caramelizes fastest. If you see it darkening too quickly, remove them from the oven immediately. The glaze should be deep amber, not black. For extra insurance, brush on a thin layer of glaze just before serving to maintain that sticky-sweet finish.
Can I make this recipe in an air fryer?
Yes! Cook wings at 375°F for 12 minutes, flip, then glaze and crisp at 400°F for 3-4 minutes. The air fryer works faster but may be slightly less crispy than oven-baked. Watch the glaze closely—it caramelizes quicker in the smaller space. The built-in basket makes glazing easier too!
What's the best way to store leftovers?
Store in an airtight container for up to 4 days in the fridge or 3 months in the freezer. Reheat in a 350°F oven for 10-15 minutes until warmed through. The glaze may thicken when cold—add a splash of water and reheat to restore its sticky texture. These wings actually taste better the next day!
Can I adjust the sweetness level?
Reduce the brown sugar to 0.5 cup for less sweetness or increase to 1 cup for extra caramelization. For a tangier profile, add 1 extra tbsp of apple cider vinegar. The pineapple juice provides natural sweetness too, so balance all components based on your preference.